Learning how to correctly place protection is a vital skill as you advance as a trad climber. The frequent denominator is they are removable, instead of stationary equipment that’s permanently fastened to the stone (for example, bolts).
To be able to put trad equipment efficiently and safely, you need to develop a great eye for where to the road to set the equipment, and you have to be proficient at identifying a protected placement from a harmful one.
In this guide, we will concentrate on putting two of their most frequent kinds of equipment: nuts (also known as stoppers or tapers) and cams.
You will find a few of guiding principles to follow if you are Learning How to place trad equipment:
- A equipment placement is just as powerful as the stone around it. Look carefully at the stone and be sure it’s strong. Do not put gear in touch with loose cubes or flakes which may pull out or break.
- Get effective at picking out the correct size equipment to get a placement. Use your fingers and palms to assess the crack, and then pick the piece that contrasts with that dimension.
- Cams normally operate well in parallel cracks while blossoms normally work well in constricting fractures.
- Prevent shallow clusters in which the bit could easily pull from this crack.
- Place equipment so it’s safe, but also consider how hard it’s going to be to eliminate.
- Putting a bit too heavy in a fracture or wedged too closely will be problematic to get a seconding climber to eliminate.
Nuts are alloy wedges of various sizes and shapes, strung with wires, and made to match in constrictions from the stone. They are comparatively cheap and lightweight, and if put well they’re extremely trustworthy.
Nuts are usually offered in a group that contains about a dozen pieces, which range from small to big. It is common practice to divide the setup into two classes arranged by dimension and clip them to 2 individual carabiners. Clip the carabiners in your harness equipment loops or into some gear sling for simple access.
First and foremost if you’re trying to find a nut positioning, you have to inspect the stone and be sure it’s strong. Do not put a nut in touch with loose cubes or flakes which may pull out or break. Much like any gear positioning, a nut positioning is just as powerful as the stone around it.
Nuts function by wedging to a constriction from the stone, so start looking for a crack that is wider at the top and tapers as it moves down. Nuts are most successful in vertical cracks with constrictions, but they can at times operate in flat cracks in the event the crack narrows in the opening. Nuts don’t operate well in cracks which flare outward or downward since there isn’t enough of a constriction to hold the item in place.
When deciding upon the size of nut to put at a fracture, remember that normally more contact between the nut and the stone equals a stronger positioning. This usually means that a bigger nut is typically more powerful than a smaller one.
Look carefully at the crack and the constriction and decide the largest size nut which will go in the crack and efficiently wedge in the constriction. For novices, this course of action is largely trial and error. If the nut is too big, it won’t enter the crack or perhaps it does not fit closely in the constriction. If the nut is too little, it could have a propensity to pull through the fracture.
As you gain experience, you are going to get better at picking out the proper size nut in your very first attempt. But with years of climbing below your belt, then you won’t get it right each time.
Nuts can be put in two principal positions: using the broad sides connected with the stone or with all the thinner ends connected with the stone. The broad sides provide greater contact with the stone and are therefore generally more secure. What is most important, however, is the way the nut matches from the crack; when the positioning together with the narrow sides calling the stone seems stronger, go with this.
To put a nut, then begin with unclipping your collection of nuts out of your harness or equipment sling. Without removing a nut out of the carabiner, catch the nut which you believe is the ideal dimensions and wait from the cable as you add it in the crack. The remaining nuts will slip into the base of the carabiner as you are mimicking the piece.
Set the nut with all the cable facing in the direction of pull if you should have a fall, which can be down and marginally out.
If you are pleased with the positioning, unclip the carabiner that is still holding the remainder of your nuts and then return it to your harness or equipment sling. Clip a quickdraw or twist into the cable loop onto the nut that you simply put and give it a gentle tug to check the safety of this positioning. Do not pull so hard that in case the nut pops out it is going to allow you to lose your equilibrium. Assuming the nut retains and the positioning looks great, give the sling a more difficult yank to actually place the piece to the constriction.
The quickdraw or Twist not only provides you a thing to pull to place the nut, in addition, it will help decrease the amount of pull the item as soon as you’ve trimmed the rope.
Cleaning (eliminating ) a nut can at times be challenging. The secret is to consider the way in which the nut was put and then reverse this. As an instance, if the nut has been slotted to a constriction from over, then you will want to push up the piece for it out. Do not get overly forceful with the cable cable; you do not need to hurt the cable.
You may try tapping on the nut with the instrument or hooking it using the nose of this instrument to pry out the piece. Nuts are relatively cheap, so in the event that you’ve given it your very best effort and can not regain it, it is fine to leave it all behind.
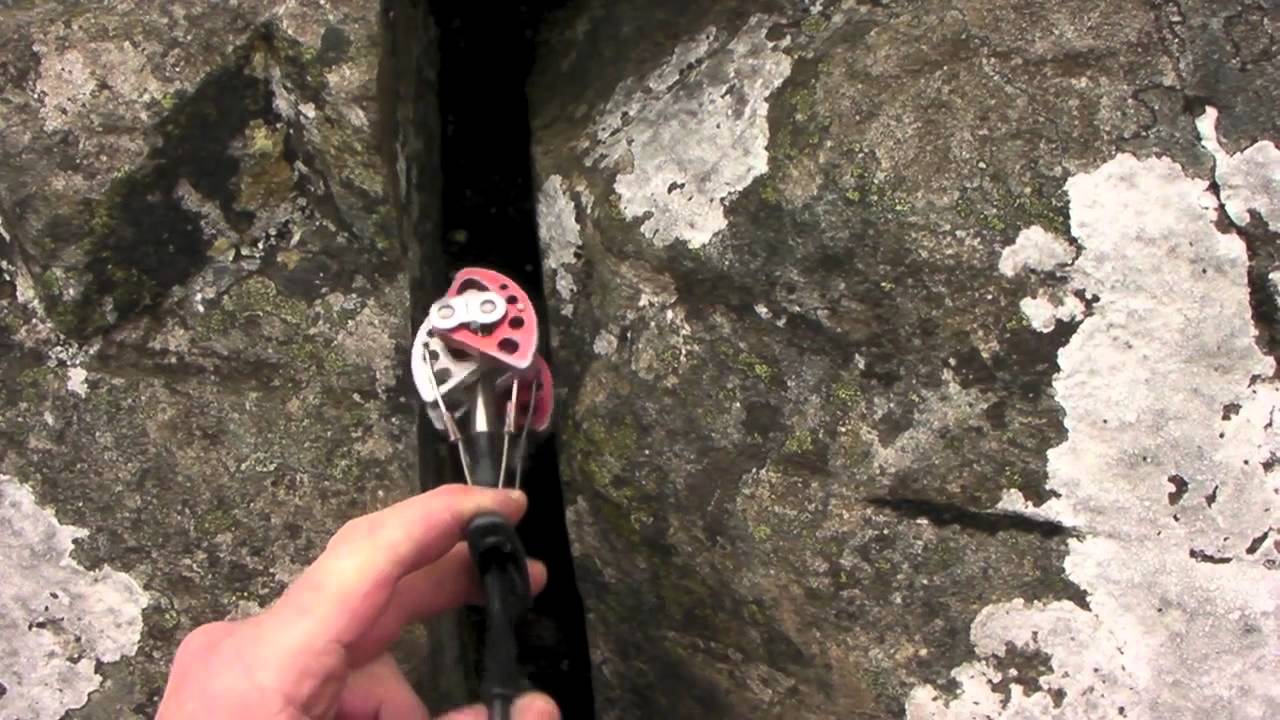
Cams, brief for spring-loaded camming devices (SLCDs)are a sort of active security (meaning that they have moving components ) They’re extremely popular as they’re normally quite simple to place. There are several different camera layouts, but the fundamentals for the way they function and how to put them are extremely similar.
Basically, cams operate by converting the down and outward pull of a collapse into force from the walls of a fracture. Together with friction that this force are able to continue to keep the camera from the crack and grab you once you fall.
Cams are usually simpler and quicker to put than nuts: you pull on the cause to retract the cam lobesinsert the camera into the crack and then release the trigger to permit the lobes to enlarge and contact the stone. But for a camera positioning to be protected you have to be capable in finding the proper location to place the cam, picking the proper size camera and setting the camera.
If you’re trying to find a place to put a camera, start looking for cracks using parallel sides or tiny pockets. You generally need to prevent cracks which extend above or beneath the camera because the camera is going to have a propensity to move in the wider area. This is known as”walking.”
Also avoid cracks which flare too much downward or outward. Flaring fractures frequently don’t offer enough surface contact with the camera’s lobes to make a safe positioning.
Much like any positioning, remember that a camera is just as powerful as the stone around it. When a camera catches a drop, it produces an enormous number of external force which can lever off pieces of stone. Look carefully at the stone to be certain it’s strong and be quite leery of flakes and freestanding cubes. Harness the stone with your fist and then listen to the noise it makes.
Cams arrive in many different sizes, letting you set them in cracks bigger than a wider broad up to cracks which are over five inches broad. It is extremely important to decide on the ideal size camera for a crack to make the most secure positioning.
As a rule of thumb, choose the most significant camera which will fit from the crack. But you have to rate the path and think of what cams to use if. You do not wish to consume all your big cams early simply to learn you desperately want one further up the road.
Beyond only looking at a fracture and estimating exactly what size camera will do the job best, you may use your palms and fingers as a means to assess the crack. With experience, you will discover a crack that is suitable for the tips of your fingers requires a particular size camera plus a crack that is suitable for your cupped hand chooses another dimension. At some point, you won’t even have to visit a crack to understand what size camera it requires, you will just have the ability to feel that the crack. We do not suggest putting cams liberally though; constantly visually inspect your placements as soon as possible.
If you are new to setting cams, then it is going to take a while until you are in a position to decide on the ideal size camera in your first attempt, and after a long time of expertise that you won’t always get it right. But, the further you climb, the better you will get at it.
Insert the camera into the crack and then release the trigger to permit the lobes to enlarge and contact the stone.
As you set the cam, consider the management of pull if you should fall and place the camera so the stem is pointed out in this direction. This may normally be down, however, the direction may fluctuate based upon the path or the particular usage of this camera.
To confirm that you have chosen the correct size camera, analyze how retracted the lobes are. Most camera manufacturers offer recommendations on how much to retract a camera and we recommend you observe these guidelines. Black Diamond indicates 50 — 90 percent retraction for their favorite Camalot cams. Metolius places colored dots around the cam lobes that signal the perfect variety of retraction for a number of the cams.
Having a camera in hand, you can find a feeling for what the variety of retraction feels like. When you are holding the camera rather than pulling the cause, the camera is 0 percent retracted. Pull the cause as tight as possible and the camera will retract to 100%. Without setting the camera in a fracture, play around with the cause and discover the point where the cam lobes have been 50% retracted. This is normally a great starting point to get a good camera positioning. Anything less than that won’t be that stable.
The quantity of retraction is essential because when a camera is weighted over the course of a fall, it enlarges. If the camera is hardly retracted (under-cammed) to start with, it’s going to have hardly any expansion left once it’s optional and will not be secure as a retracted camera. Additionally, a camera which isn’t retracted enough will sit in a fracture and may be more prone to walking around in the fracture.
On the opposite end of the spectrum, a camera that’s over 90% is at danger of becoming permanently stuck at the crack. Over-retracting (over-camming) a camera is when you put a camera that’s fully, or almost completely, retracted.
An over-cammed camera is normally quite stable, but in addition, it is nearly impossible to eliminate since there’s hardly any retraction left from the camera. Cams are not inexpensive, so try not to receive them stuck.
After You’ve put the camera in a fracture, watch your positioning and recall these key items:
- Is your stem of this camera aligned with the expected direction of attraction if you should have a fall?
- Are lobes of the camera evenly retracted?
- Is your camera roughly 50 — 90% ?
- Is your camera put so it will not open up if it walks?
When you are learning how to put nuts and cams, ease to it. Here Are a Few Tips for practicing good equipment placements:
- Follow a more seasoned climber a scale and analyze their placements as you are cleaning the bits.
- Locate a crack that’s available from the floor and experimentation with equipment placements. Clip a twist to a bit and use your own body weight to have a feeling for how well the item is put. Know this however: drops generate much more forces than just standing on a bit.
- Can a mock guide: Recruit two buddies and have among these belay you on top rope while another belays you using another rope as though you’re directing the climb. It’s possible to set equipment, clip on the rope and also take drops understanding you have the best rope as copy.